Posts mit dem Label Azure werden angezeigt. Alle Posts anzeigen

Montag, 14. Oktober 2019

Azure specific Security Tooling


Azure specific Security Tooling Overview


Samstag, 5. Oktober 2019

Microsoft Security Stack - When to use what


When to use what – Azure Sentinel, CASB, Azure Security Center, Security & Compliance Center in Office 365, etc.

Many customers using Microsoft Cloud Services in the context of collaboration und communication often asked the “When to use what” question. Meanwhile we had several really good methods and tools to answer this question like the Periodic Table of Office 365. At the end it is not about when to use what, it is about “what do you want to do” or “what is your business case”? And this is the same with the Microsoft Security Features & Services.

Features & Services

Microsoft Azure Sentinel is a cloud-native SIEM solution with advanced AI and security analysis capabilities.

Microsoft Cloud App Security is a multimode Cloud Access Security Broker (CASB). It provides rich visibility, control over data travel, and sophisticated analytics to identify and combat cyberthreats across all your cloud services. Further infos about CASB

Azure Security Center provides unified security management and advanced threat protection across hybrid cloud workloads.

Office 365 Security & Compliance Center is designed to manage security & compliance features across Office 365. Links to existing SharePoint and Exchange compliance features bring together compliance capabilities across Office 365.

Microsoft Intune is a management solution that provides mobile device, endpoint and operating system management. It aims to provide Unified Endpoint Management for corporate devices and BYOD.

Azure Active Directory (Azure AD) is Microsoft’s cloud-based identity and access management service. It covers resources, such as Microsoft Office 365, the Azure portal, and thousands of other SaaS applications along with any cloud apps developed by your own organization.

Microsoft Information Protection helps an organization to classify and protect its documents and emails by applying labels. It helps you discover, classify, label and protect your sensitive information – wherever it lives or travels. Further infos about Information Protection

Protect your enterprise from threats in the cloud and on-premises with Azure Advanced Threat Protection. ATP is a cloud-based security solution that leverages your on-premises Active Directory signals to identify, detect, and investigate advanced threats, compromised identities, and malicious insider actions directed at your organization.

Microsoft Defender Advanced Threat Protection (ATP) is a unified platform for preventative protection, post-breach detection, automated investigation, and response. Microsoft Defender ATP is built into Windows 10.


Typic discussions with customers

Azure Sentinel vs. Azure Security Center

Azure Security Center is focusing on Azure workloads. Azure Sentinel is used to for real-time event and detecting attacks covering your hole architecture.
Quote by Microsoft: To reduce confusion and simplify the user experience, two of the early SIEM-like features in Security Center, namely investigation flow in security alerts and custom alerts will be removed in the near future. Individual alerts remain in Security center, and there are equivalents for both security alerts and custom alerts in Azure Sentinel. Going forward, Microsoft will continue to invest in both Azure Security Center and Azure Sentinel. Azure Security Center will continue to be the unified infrastructure security management system for cloud security posture management and cloud workload protection. Azure Sentinel will continue to focus on SIEM. Source: Securing the hybrid cloud with Azure Security Center and Azure Sentinel


Azure Security Center vs. Security and Compliance Center in Office 365

The Office 365 Security & Compliance Center is designed to help you manage security & compliance features across Office 365. Links to existing SharePoint and Exchange compliance features bring together compliance capabilities across Office 365. Azure Security Center analyzes data from a variety of Microsoft and also partner solutions. To take advantage of this data, machine learning for threat prevention, detection, and eventually investigation. Both services are part of the Microsoft Service Trust Platform


Azure Sentinel vs. CASB

Azure Sentinel is a SIEM solution with advanced AI and security analysis capabilities. It integrates with third-party security platforms from vendors such as Fortinet, Symantec and Check Point, as well as Microsoft's Graph Security API. By connecting with Microsoft Cloud App Security, you will gain visibility into your cloud apps, get sophisticated analytics to identify and combat cyberthreats, and control how your data travels.


Office 365 Security Features vs. Intune

Microsoft Intune and built-in security features in Office 365 for MDM both give you the ability to manage security & compliance in your environment. You can manage security & compliance using both Intune and Office 365 in the same Office 365 tenant. If you have both options available, you can choose whether you manage security & compliance in Office 365 or the more feature-rich Intune solution for MDM and MAM scenarios.


Azure AD vs. Intune

Intune manages mobile devices and apps. It integrates closely with other EMS components like Azure Active Directory for identity and access control.


Azure Advanced Threat Protection vs. Microsoft Defender ATP

Azure Advanced Threat Protection enables you to integrate Azure ATP with Windows Defender ATP. While Azure ATP monitors the traffic on your domain controllers, Windows Defender ATP monitors your endpoints, together providing a single interface from which you can protect your environment. By integrating Windows Defender ATP into Azure ATP, you can leverage the full power of both services and secure your environment. Source & Details: Integrate Azure ATP with Windows Defender ATP


Roundup

As you can see all this features work together like for example Microsoft Defender Advanced Threat Protection integration with Microsoft Cloud App Security or Azure Information Protection integration with Cloud App Security So trying to find the best tool / solution for your enterprise only discussing the detailed features isn’t the best way.

How to get started

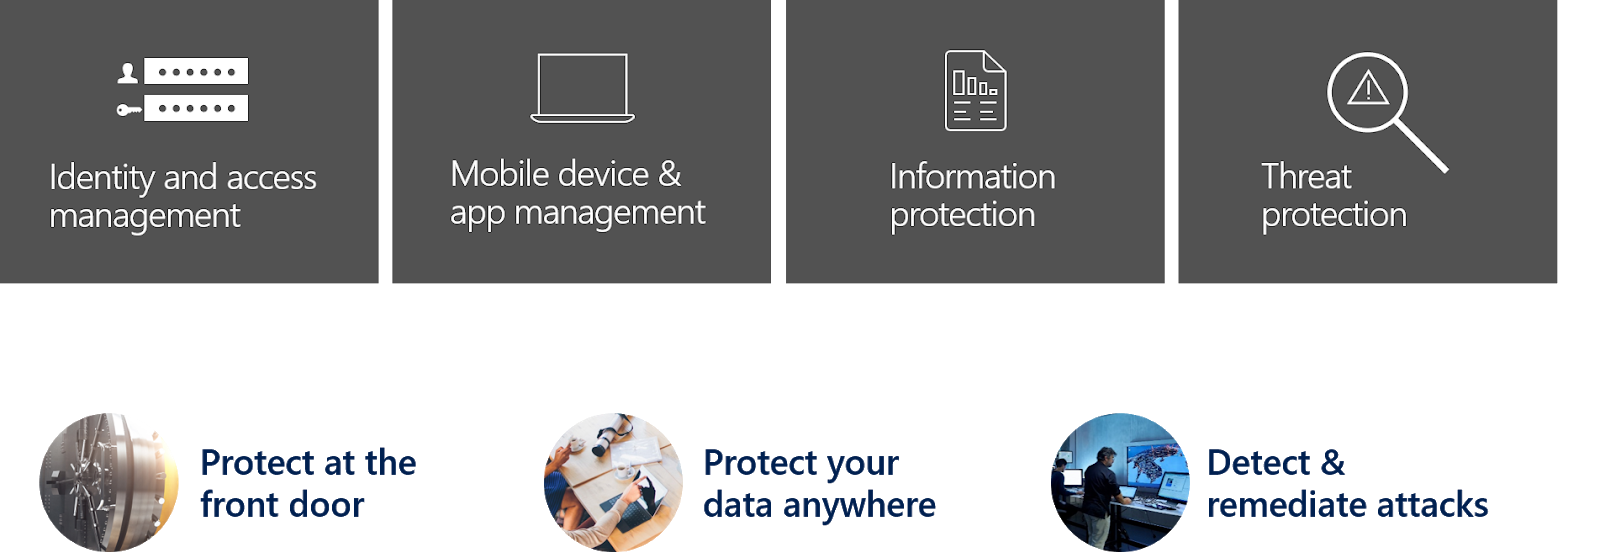
To get a solid Security & Compliance strategy based on the Microsoft Security Stack the best way is to start with your scenarios. Dealing with the Microsoft Security Stack a best practices approach is to separate the topics like this:

Next step is to map the scenarios:
  • Protect at the front door
  • Protect your data anywhere
  • Detect & remediate attacks
to those 4 categories / topics:
  • Identity and access management
  • Mobile device & app management
  • Information protection
  • Threat protection

Periodic table & mapping

Microsoft offers a good overview to tweak your scenarios in this article Top 10 Actions to Secure Your Environment. Based on this the following overview offers a blueprint to get started with your security strategy:

Architecture


Roundup

From a planning and architecture perspective the features and services must be separated in monitoring solution and solution used to natively setup regulations and policies.
For example: You can use Information Protection to protect you content and E-Mails and in addition you can integrate the Logs and Signals coming from Information Protection to Azure Sentinel. But natively you cannot use Azure Sentinel to protect you content and E-Mails.
So at the end it is all about your scenarios!

Montag, 27. Mai 2019

Security Features Matrix in Office 365 and Azure

UPDATED VERSION 1.1. availible

  • The matrix gives you an overview about security feature in Microsoft cloud stack including info about:
  • focus-area of the feature
  • a overview description plus hyperlink for further information
  • info about how to license the feature.
Screenshot:


Download the complete Matrix: LINK

  • added Azure Sentinel PREVIEW


Further interesting and helpful links:


Dienstag, 9. Oktober 2018

Usage Report, AIP Scanner UI and Data Discovery for Azure Information Protection

Microsoft is enrolling new Azure Information Protection features and a new AIP scanner UI including status of the scanner machine and some statistics like scan rate, version etc.

AIP scanner UI

This new scanner UI feature will include the capability to start the scan on the remote scanner without a need to login to the scanner machine.
We can access this new preview feature using this link: https://portal.azure.com/?Scanner=true#blade/Microsoft_Azure_InformationProtection/DataClassGroupEditBlade/scannerNodesBlade
Latest GA or public preview version of AIP Client is needed in order to see your scanner machines connected to the Azure portal and be able to manage them.

Usage Report

AIP Usage report is showing labels, protected item count and users & computers who are interacting with AIP. We will also get an overview about used labels and about used clients to label content.

Data Discovery

Data Discovery is showing an overview about used Labels, detected Information Types, locations,
labeled and protected files etc.

Usage Report and Data Discovery are based on Azure Log Analytics.

Mittwoch, 3. Oktober 2018

A quick guide to secure Office 365 - UPDATE


Microsoft is investing a lot in security & compliance. At the end it is a complex story to figure out which feature and which license is needed to fulfill your security & compliance needs.

“A quick guide to secure Office 365” is a Whitepaper based on simple tiers like Default, Medium, High and Very High. The matrix shows the usability impact and the needed licenses to setup the different scenarios.

You get a clear overview about the options and the impact of each scenario. In addition, the Whitepaper gives you an overview of Microsoft technologies and features to secure your Office 365 tenant. Covered technologies are Office 365 Secure Score, Cloud App Security, Intune & Office 365 MDM, Azure AD Premium features, Office 365 Advanced Threat Protection & Office 365 Threat Intelligence and the Security & Compliance Reports.

Here you can download the complete Whitepaper:


Watch this video of my session at Microsoft Ignite 2018 about “How to deal with external sharing” covering most if the topics in the Whitepaper:


Here you can download a Sketchnote by Luise Freese based on my session at Ignite 2018 also covering these topics: LINK


Montag, 13. August 2018

Azure Information Protection Part V – advanced features & scenarios

Label an Office document by using an existing custom property

This option allows us to reflect on existing metadata values for example coming from SharePoint or other solutions like for example Secure Islands (which was acquire by Microsoft in 2015).
As a result of this, when a document without an Azure Information Protection label is opened and saved by a user, the document is then labeled to match the corresponding property value.
This configuration requires two settings in the advanced client settings section. The first is named SyncPropertyName, which is the custom property name that has been set from the other classification solution, or a property that is set by SharePoint. The second is SyncPropertyState and must be set to OneWay:
  • Key 1: SyncPropertyName
  • Key 1 Value: <property name>
  • Key 2: SyncPropertyState
  • Key 2 Value: OneWay

Keys and corresponding values are good for one custom property.
Example:
We have a SharePoint column named Classification. Possible values are: Public, Internal and Confidential. SyncPropertyName value is then: Classification.
To make this feature work we need labels with the same name (Public, Internal and Confidential) in AIP. Now, when an Office documents from this SharePoint library is opened and saved and this document is labeled as Public, Internal or Confidential in SharePoint Azure Information Protection applies the corresponding AIP label. If no label with a corresponding name exists in AIP, the document remains unlabeled.


Convert Templates to Labels

When you create a label in AIP under the hood also a new custom template is created. This new template can then be accessed by services and applications also using Rights Management templates. The new template is not shown in Azure AIP portal but can be managed by using PowerShell.
If you delete the label the template will still exists and is then shown in Azure AIP portal. In Azure AIP portal you can convert a template to a label:
If you change the protection settings in this newly created label, you're changing them in the template and any user or service that uses this template will get the new protection settings with the next template refresh.


Cloud App Security to auto apply Labels for scenario / location

Microsoft Cloud App Security lets you apply AIP labels as part of a CAS policies. You can also investigate files by filtering for the applied classification label within Cloud App Security.
Scenarios:
  • Apply classification labels as a governance action to files that match specific policies
  • View all classified files in a central location
  • Perform investigation according to classification level
  • Create policies to make sure classified files are being handled properly

More details:

Encrypting Emails using Exchange Mail Flow Rule

Exchange Mail Flow Rule can be used to automatically apply AIP labels:
This is based on the RMS template associated to the AIP label.
A step-by-step documentation on how to configure a mail flow rule using a RMS template can be found here: https://blogs.technet.microsoft.com/kemckinn/2018/07/09/encrypting-emails-from-anywhere/


Decommissioning and deactivating protection

If AIP is no longer needed you can deactivate it. Make sure that you have a copy of your Azure Information Protection tenant key before you deactivate the Azure Rights Management service. If you deactivate AIP make sure, that you won’t be locked out of content that was previously protected.
You have the following options to deactivate AIP:
  • PowerShell cmdlet Disable-Aadrm to deactivate Rights Management
  • Deactivate Rights Management from Office 365:
    • Go to the Rights Management page for Office 365 administrators
    • On the Rights Management page click deactivate
  • Deactivate Rights Management from the Azure portal
    • On Azure Information Protection blade => Protection activation blade, select Deactivate

Further details about deactivating AIP: https://docs.microsoft.com/en-us/azure/information-protection/deploy-use/decommission-deactivate


Related posts:


Dienstag, 31. Juli 2018

A quick guide to secure Office 365


“A quick guide to secure Office 365” is a Whitepaper based on simple tiers like Default, Medium, High and Very High. The matrix shows the usability impact and the needed licenses to setup the different scenarios. 
You get a clear overview about the options and the impact of each scenario. In addition the Whitepaper gives you an overview of Microsoft technologies and features to secure your Office 365 tenant. Covered technologies are Office 365 Secure Score, Cloud App Security, Intune & Office 365 MDM, Azure AD Premium features, Office 365 Advanced Threat Protection & Office 365 Threat Intelligence and the Security & Compliance Reports.

Download a free copy of A quick guide to secure Office 365

A quick guide to secure Office 365 ist ein Whitepaper, das auf einfachen Stufen aufbaut: Standard, Medium, High und Very High. Die Matrix zeigt die Auswirkungen auf die Useability und die benötigten Lizenzen, um die verschiedenen Szenarien umzusetzen.
Sie erhalten einen klaren Überblick über die Möglichkeiten und Auswirkungen der einzelnen Szenarien. Darüber hinaus gibt Ihnen das Whitepaper einen Überblick über Microsoft Technologien und Features die zur Absicherung Ihres Office 365 Tenants zur Verfügung stehen. Im Einzelne werden die Technologien Office 365 Secure Score, Cloud App Security, Intune & Office 365 MDM, Azure AD Premium Features, Office 365 Advanced Threat Protection & Office 365 Threat Intelligence und die Security & Compliance Reports beschrieben.

Laden Sie sich eine kostenlose Kopie von A quick guide tosecure Office 365 herunter.

Donnerstag, 19. Juli 2018

Azure Information Protection Part IV - Work with AIP

Azure Information Protection is a cloud-based solution that can be used to classify, label and protect data and e-mails. The nice thing about it is that depending on the implementation, this works without the user's intervention. Rules are automatically applied based on metadata, storage location, template on which a document was created or on the content of the document.
Of course, users can also assign classification manually. A combination of both, whereby proposals are displayed to the user based on administrative specifications, can also be implemented.
AIP integrates into the Office Client applications Word, Excel and PowerPoint from version 2010 in the Enterprise or Office ProPlus version. With this integration, files can be classified and protected directly from Office applications. Word, Excel and PowerPoint also display the classification of a file directly:
The AIP Client is used to protect and classify non-Office files. This free software is used to classify and protect e.g. PDF documents and other files. The AIP Viewer is also used to open protected non-Office files. This tool is available free of charge for the iOS, Android, macOS and Windows platforms. Details on supported platforms and Office versions can be found here: https://docs.microsoft.com/en-us/azure/information-protection/get-started/requirements-applications  

Overview of the features of AIP

The AIP feature essentially works with 2 objects:
Labels:
  • A label is used for classification; e.g. CONFIDENTIAL
  • A label can contain encryption, but can also be used for classification purposes only
  • The following rights can be assigned during encryption: View, Open, Read (VIEW) | View Rights (VIEWRIGHTSDATA) | Edit Content, Edit (DOCEDIT) | Save (EDIT) | Print (PRINT) | Copy (EXTRACT) | Reply (REPLY) | Reply All (REPLY ALL) | Forward (FORWARD) | Change Rights (EDITRIGHTSDATA) | Save As, Export (EXPORT) | Allow Macros (OBJMODEL) | Full Control (OWNER)

Policies:
  • Policies determine which users/groups have which labels available
  • Policies also regulate administrative options such as whether a standard label is assigned

Due to the integration into the Outlook client, labels can also be assigned directly when writing an email. The classification then affects documents that are sent as attachments to the mail and the e-mail itself.

In addition to labels and policies there is another useful function. The "Protect with user-defined permissions" function is used to encrypt files individually and make them available with explicit rights for certain users (including external users). This feature can be used in both the AIP Client and Office integration. The following individual options can be configured per file:
  • Displaying user: Display only
  • Check: Display, Edit
  • Co-author: view, edit, copy, print
  • Co-owner: All rights
  • Only for me
  • User / Group: Users or groups by e-mail address, who should have access with the selected right
  • Expiration of the access: Date how long the access for the selected users / groups with the configured right should exist

Details on the individual functions of AIP can be found here: https://azure.microsoft.com/en-us/services/information-protection/

Typical scenarios

Scenario 1: A user creates a document. The user knows which category the document must be assigned to and is responsible for assigning the corresponding label.

Scenario 2: In addition to scenario 1, automatic classification can be used. To do this, we need to define or create own information types. Microsoft provides standard information types such as credit card number, driver's license number, etc. A complete list of standard information types can be found here: https://support.office.com/en-us/article/what-the-sensitive-information-types-look-for-fd505979-76be-4d9f-b459-abef3fc9e86b?ui=en-US&rs=en-US&ad=US

Scenario 3: Classification Based on location. The AIP scanner, which is part of the AIP client, is used to do this. The scanner can encrypt NTFS shares and SharePoint libraries. Example: all files that are stored in a specific folder or in a specific SharePoint library always get the label "Confidential - Contract". The AIP scanner runs as a service on a Windows server. Using PowerShell and a parameterized call, the scanner then checks and encrypts contents in the defined storage locations with the specified label.

Licensing

Microsoft Azure Information Protection is available as a standalone solution or as part of the Enterprise Mobility + Security Suite, Microsoft 365 Enterprise and Office 365 E5.
AIP is available in three different versions: AIP for Office 365, AIP P1 and AIP P2 Details on the different versions can be found here: https://azure.microsoft.com/en-us/pricing/details/information-protection/
Only the user who protects content needs a license. External users or users who only consume do not need to be licensed.

AIP, RMS and IRM

Definition and dependencies:
  • RMS: The Azure Right Management Service is the basic instance for encryption and rules. Word, Excel, PowerPoint, Outlook and the Office Server SharePoint and Exchange provide native support for Azure Rights Management and provides document and email protection.
  • AIP: Azure Information Protection is based on RMS and requires the RMS service in the background. With AIP, files can be individually encrypted and classified. File tracking and detailed reporting show who opened an AIP-protected file, when and from where.
  • IRM: Information Rights Management is required to connect RMS to Exchange or SharePoint. If we need to connect the on-prem versions of Exchange or SharePoint or an NTFS file server, an RMS Connector is required. IRM integrates seamlessly into Exchange and SharePoint.

IRM with Exchange and SharePoint:
  • To protect an e-mail with the "Do not forward" restriction, the Information Rights Management options for Exchange is required. With IRM in Exchange features like DLP can also be used.
  • IRM integration can be used to encrypt files stored in SharePoint. This integration does not offer the flexibility and functionality of AIP. Documents in SharePoint are not encrypted until they are downloaded for example. IRM does not provide an option to classify files and permissions must be assigned by an administrator at the site or library level.

Depending on the detailed scenario, either AIP or IRM can be used. Both functions require the RMS service in the background.
Details about RMS, IRM and the limitations with SharePoint are described in this article: https://docs.microsoft.com/en-us/azure/information-protection/understand-explore/office-apps-services-support


Related posts:


Freitag, 15. Juni 2018

Azure Information Protection Part III – AIP Scanner

The AIP Scanner is part of the AIP Client download. After you have downloaded and installed the AIP Client you can start the installation and configuration. But bevor we start the installation let’s have a look at some requirements:
  • A Windows Server 2012 R2 or 2016 Server to run the service (For test and demo you can install it on a Win10 machine)
  • A SQL Server 2012+ local or remote instance (Any version from Express or better is supported)
  • Sysadmin role needed to install scanner service
  • Service requires Log on locally right and Log on as a service right
  • AIP Scanner is an AIP Premium P2/EMS E5 feature for more details review this article: https://azure.microsoft.com/en-us/pricing/details/information-protection/ 

A really good steep-by-steep description about install and configure AIP Scanner is done by Kevin McKinnerney and can be found here: https://blogs.technet.microsoft.com/kemckinn/2018/03/23/easy-configuration-of-the-azure-information-protection-scanner/

As you see in Kevins steep-by-steep guide the scanner runs as a service and uses App Authentifiction to connect with the AIP Service. So we do not need to authenticate to use the scanner.
The scanner has two main configurations which we need to configure using PowerShell:
  • Add-AIPScannerRepository or Set-AIPScannerRepository -> it is about the locations and the conditions for this location
  • Set-AIPScannerConfiguration -> it is about what the scanner should do during the scan

Add-AIPScannerRepository

This cmdlet adds a so called data repository to be scanned and creates a profile of settings. For example, you can specify a default label for unlabeled files, and whether to override an existing label or not. We can specify local folders, UNC paths, and SharePoint Server URLs for SharePoint sites and libraries. The scanner can handle more than one data repository. So you can configure a mix of local folders, UNC paths and SharePoint Server URLs with different setting covered by one AIP Scanner installation.
To change this settings we can use: Set-AIPScannerRepository cmdlet. To remove a data repository use: Remove-AIPScannerRepository cmdlet.
Example:
Set-AIPScannerRepository -Path C:\Temp2 -SetDefaultLabel UsePolicyDefault -MatchPolicy On

To review the settings, we can use Get-AIPScannerRepository. As you can see in my example I have configured two repositories with different settings:


Set-AIPScannerConfiguration

Set-AIPScannerConfiguration cmdlet is used to configure settings for the AIP Scanner. These settings include:
  • Discovery mode or applies labels
  • File will be relabeled YES or NO
  • File attributes are changed YES or NO
  • What is logged in the reports
  • Scanner runs once or continuously
  • Justification message used when required
  • Rights Management owner for protected files

Example:
Set-AIPScannerConfiguration -Enforce On -Schedule Manual -DiscoverInformationTypes All

Set-AIPScannerScannedFileTypes


This cmdlet is used to let the scanner know which files types should be scanned.

The cmdlet sets a list of file types to scan or exclude from scanning. To scan all file types, use *. To scan only specific file types use *.<file name extension>. To exclude specific file types from being scanned use -*.<file name extension>. And to reset the list back to default use @().


If no data repository is specified the setup applies to all data repositories that do not have their own list specified.
To get more examples and details review the official documentation: https://docs.microsoft.com/en-us/powershell/module/azureinformationprotection/set-aipscannerscannedfiletypes?view=azureipps

Scenarios

The scanner can typically be used for the following scenarios. Reports are stored in this location: %localappdata%\Microsoft\MSIP\Scanner\Reports

Scan for sensitive information types
#Configure data repository:
Add-AIPScannerRepository -Path C:\Temp2

#Configure Scan: Scan for all known sensitive types
Set-AIPScannerConfiguration -Enforce Off -Schedule Manual -Type Full -DiscoverInformationTypes All

#Start Scan
Start-Service AIPScanner
Start-AIPScan -reset

Label / Protect files
#Configure data repository:
Add-AIPScannerRepository -Path C:\Temp2 -OverrideLabel On -DefaultLabelId ae7eaeb0-cfdf-4217-a895-32a6b41311d9 -MatchPolicy Off

#Configure Scan: Scan for all knowen sensitive types
Set-AIPScannerConfiguration -Enforce On -Schedule Manual -ReportLevel Debug -Type Full

#Start Scan
Start-Service AIPScanner
Start-AIPScan -reset

Scan for sensitive information types and labels and protect files that match
#Configure data repository:
Add-AIPScannerRepository -Path C:\Temp2 -OverrideLabel On -MatchPolicy On

#Configure Scan: Scan for all knowen sensitive types
Set-AIPScannerConfiguration -Enforce On -Schedule Manual -Type Full -DiscoverInformationTypes All

#Start Scan
Start-Service AIPScanner
Start-AIPScan -reset

Related posts: