Posts mit dem Label SharePoint 2013 werden angezeigt. Alle Posts anzeigen

Samstag, 9. September 2017

Using site classification for SharePoint Sites

Site classification is a must-have when we talk about Governance, Compliance and also topics around GDPR.
Beside 3rd party solutions focusing on site and content classification we have also some out of the box options and developer opportunities in Office 365 and SharePoint on-prem. Depending on if we are talking about classic SharePoint Site Collections or if we talk about modem Team Sites, being part of an Office 365 Group, we have different szenarios.

To create a new SharePoint site in Office 365 we know two different ways.

  1. We can create a SharePoint Online Site using the SharePoint Online Administration. This will create a SharePoint Site based on WebTemplate STS
  2. We can go to SharePoint Home and click “create” in the upper left corner or we can go to Outlook Online and create a new Group. Both will create a SharePoint Site based on WebTemplate GROUP
To provide a site classification solution for classic Team Sites created by option 1 we need to implement the following: Implement a SharePoint site classification solution. This works also for SharePoint 2013 on-prem. The article describes a full solution including policies for site closing and deletion depending on the classification setting. As you can see the article describes some steps to do:
  • Define and set site policies
  • Insert a custom action
  • Custom site classification
  • Add a classification indicator to site page
Using the opportunities we have with Groups and Group Policies some of these things can be automatically put to a SharePoint Site based on WebTemplate GROUP.
This video by Vesa Juvonen is showing the steps and the final results:
As you can see we need to create the site bases on option 2.
(Dialogs already including policies)
SharePoint Home - Create:
Outlook Online -> Create Group:

Final result:

Step by Step

To enable this functionality in Office 365 we need to set up an “Settings Object” and a “Settings Template” in Azure AD. To do this we can use the Azure Active Directory cmdlets for configuring group settings.

First of all we need to install the preview of Azure Active Directory V2 PowerShell Module:

Install-Module -Name AzureADPreview

To set up the site classification options and configure properties like ClassificationList and ClassificationDescriptions etc follow these steps also shown in Vesas video:

#Connect
Connect-AzureAD
Get-AzureADDirectorySettingTemplate

#Create
$Template = Get-AzureADDirectorySettingTemplate -Id 62375ab9-6b52-47ed-826b-58e47e0e304b
$Setting = $template.CreateDirectorySetting()
$setting["UsageGuidelinesUrl"] = "http://sharepointtalk.com"
$setting["ClassificationList"] = "Public, Internal, TopSecret"
$setting["DefaultClassification"] = "TopSecret"
$setting["ClassificationDescriptions"] = "Public:no restrictions,Internal:all internal users can access,TopSecret:only special users can access"
$setting["GuestUsageGuidelinesUrl"] = "http://sharepointtalk.net"
New-AzureADDirectorySetting -DirectorySetting $setting

#Check
Get-AzureADDirectorySetting -All $True
(Get-AzureADDirectorySetting -Id %%YOUR ID%%).values

As described in the video we can now use the CLASSIFICATION property to assign a site policy or any other custom action. Details about site policies are part of Implement a SharePoint site classification solution.

Here the script taken from the video to get the CLASSIFICATION property:

#Get PnP PowerShellOnline
Install-Module SharePointPnPPowerShellOnline
#Get Site classfication value
Connect-PnPOnline https://%YOUR TENANT%.sharepoint.com/sites/%YOUR SITE%
Get-PnPSite
$Site.Classification
Get-PnPProperty -ClientObject $Site -Property Classification

Samstag, 25. Oktober 2014

Deactivate social feature MySite, Newsfeed, OneDrive, Sync, Share & Follow in SharePoint 2013

In several project I had the request to deactivate one or all of the following features. Poorly there is no consistent way to do it.

Sync button

To deactivate that feature we can use the SPList.ExcludeFromOfflineClient property. With this PowerShell Script we can set the value to 1 which deactivates the Synch function everywhere.

THX Sahil Malik for that script

Get-SPSite -limit all | get-SPWeb -limit all | Foreach {$_.Title = $_.Title;
$_.ExcludeFromOfflineClient=1; $_.Update()}


MySite:

If we can start with a fresh system we can remove the permissions to create MySites. If already MySites are created we first must delete them. Only the MySites, not the MySite host!
Do not give the user the option to set up MySites will also remove the Newsfeed and the OneDrive link in the SharePoint top link bar.


Share

This script disables the “Allow access request” setting under Site Settings -> Site Permissions -> Allow access request for all Sites and SubSites und the configured URL

$Webapp = Get-SPWebApplication "http://MySharePointURL"
ForEach ($site in $webapp.Sites)
{ForEach ($web in $site.AllWebs | where {$_.RequestAccessEnabled -and $_.Permissions.Inherited -eq $false})
{$web.RequestAccessEmail=""
write-host $web.Title, $web.URL updated}}

The “Share” button and also the entries in the HoverPannels and context menus are still there but the user get the message that he did not have the right to share content or sites. Another option is to set the max allow documents, sites and users to follow to 0. We can do this in Manage Profile Service -> MySites settings section -> Manage Following http://technet.microsoft.com/en-us/library/jj219740(v=office.15).aspx


Follow

This script goes through the hierarchy and disables the Following Content feature in every WebSite. You get an error message for every site where the feature is not active or missing. This can be ignored

$w = Get-SPWeb http://MySharePointURL | ForEach{ $_.URL }
Get-SPFeature -Web $w |%{ Disable-SPFeature -Identity "FollowingContent" -URL $w -Confirm:$false}

Montag, 14. Juli 2014

Chapter 2 - SharePoint 2013 Analytics Feature

Using the SharePoint 2013 analytics feature

Found chapter two of my tutorial about using the SharePoint 2013 analytics feature on itunity:

Using the SharePoint 2013 analytics feature

Visit us under www.itunity.com                          Follow us on Twitter @itunity01 


Sonntag, 27. April 2014

Chapter 1 - SharePoint 2013 Analytics Feature


First chapter of my tutorial about SharePoint 2013 Analytics Feature is only on itUnity:
Visit us under www.itunity.com                          Follow us on Twitter @itunity01 

Sonntag, 9. März 2014

Future of DocPush feature in SharePoint 2013

One of the most missing features in SharePoint Search is the option to push content direct to the index. In FAST ESP we have that functionality. Within FAST for SharePoint 2010 there was a tool called docpush.exe. Using this tool you can push content to the index. But this tool was not designed for productive use. There were several problems around this. For example if you push a document direct to the index using this tool and the crawler catches it also you have duplicates. During SPC14 the information came up that a push functionality for SharePoint 2013 search was already on the roadmap for SP1. Because of some unsolved problems it did not come with SP1. But this means it’s no longer a question if this function is coming – it’s only the question when it comes.

The function is no longer realized in a separate tool like the docpush.exe in FAST for SharePoint 2010. The function would be integrated as part of the SharePoint 2013 Search REST API. So there is a good changes that it also comes for SharePoint online. Locking forward what that all could mean for missing option to create own content sources for SharePoint Online. Stay patient. News are coming up soon.

Freitag, 28. Februar 2014

Problems fixed by CU´s in SharePoint 2013 Search since release

March 2013 update
Server: KB 2767999
Foundation: KB 2768000
    • When you perform a search on a SharePoint Server 2013-based server, you experience performance problems on the server.
    • The output cache feature does not work on a page on a SharePoint Server 2013 site. This issue occurs when the page contains a Content By Search (CBS) web part.
    • Assume that you use the Cross-Site Publishing feature to create a site on a SharePoint Server 2013-based server. When you perform a search on the site, the search results is greater than the expected number.
    • Assume that you access a SharePoint site that is not in your trusted sites list. When you try to search an item on the site, you receive the following error message:
      • “The display template had an error. You can correct it by fixing the template or by changing the display template used in either the Web Part properties or Result Types.”
    • When you try to perform a search crawl on a list that contains many columns in SharePoint Server 2013, you receive the following error message:
      • “The filename or extension is too long”
    • Assume that you filter data in an Access form on a non-English version of a SharePoint Server 2013 server. In this situation, Full-Text Search in SQL Server does not work correctly. More specifically, the filtering operations are slow or return incomplete results.
    • When you perform a search in a SharePoint Server 2013 search center in backward compatibility mode, the out of box (OOB) site refiner returns incorrect results.
April 2013 update
Server: KB 2726992
Foundation: KB 2751999
  • Assume that you install multiple Search Service applications in SharePoint Server 2013. When you use a Search Service application to crawl a site, managed properties are not displayed in the Search Service application. Instead, the managed properties are unexpectedly displayed in another Search Service application. 
June 2013 update
Server: KB 2817414
Foundation: KB 2817346
  • When you pass query parameters to query rules from Search Web Part on a SharePoint Server 2013 site, the search results are not updated. 

August 2013 update

Server: KB 2817616
Foundation: KB 2817517
  • When you remove a SharePoint Server 2013 server from a SharePoint Server 2013 farm, the search admin component on another SharePoint Server 2013 server crashes continuously.

October 2013 update

Server: KB 2825647
Foundation: KB 2825674
  • This update improves the stability of search components in large server farms.
  • The language selection drop-down list on the search page does not extended fully.
December 2013 update
Server: KB 2850024
Foundation: KB 2849961
  • When you add a friendly URL or a URL to a non-published item under Search Center Navigation on a SharePoint Server 2013 site, you receive the following error message:
    • Sorry, something went wrong
    • An unexpected error has occurred. 
Service Pack 1
Server: KB 2817429
Foundation: KB 2817439
  • Search schema compression is now enabled by default to allow larger search schemas.
  • Highlighting for FQL queries is now enabled for FQL as well as KQL.

Donnerstag, 27. Februar 2014

Query SharePoint Search Analytics using PowerShell

Analytics have been completely revised in SharePoint 2013. Some of the core tech in the previous FAST release has been fused together with SharePoint enterprise search to create a new and powerful analytics engine.
The Analytics Engine is based on two main parts. We have Search Analytics and we have Usage Analytics features. Both parts have own reports which can be found under Site setting and as part of the Search Service Application in Central Admin.
Usage Analytics out-of-the-box report:
Search Analytics out-of-the-box report:

By using PowerShell we can query both Analytics parts and get custom reports.

Usage Analytics:

First of all we have to set the Search Service Application:
 $searchApp = Get-SPEnterpriseSearchServiceApplication

Next step is setting up a site scope for the report:

Now we can execute the request:
$result = $searchApp.GetRollupAnalyticsItemData(1,[System.Guid]::Empty,$Site.ID,[System.Guid]::Empty)

If the report should not have a site focus we had to replace the$Site.ID” part with “[System.Guid]::Empty”.

To focus the report data to a specific day or month we can use the GetHitCountForDay and the GetHitCountForMonth method.
First we had set up the data to which we want to focus:
$FilterDate = Get-Date "2014-01-20"

Then we can use the $FilterDate variable together with both methods:
$result.GetHitCountForDay($FilterDate)
$result.GetHitCountForMonth($FilterDate)

Search Reports:

Search Analytics cmdlets follows a different syntax. To get data from that engine we also had to setup the 

Search Service Application:
$searchApp = Get-SPEnterpriseSearchServiceApplication

Also in this case we can focus to a specific site using a variable:

The difference now is that we had to set up a date time value for the report. Leaving it blank is no option here:
$searchApp.GetSearchReport(1,[System.Guid]::Empty,[System.Guid]::Empty,[System.DateTime]::Now,$false,100)
That command gets the report data for the actual month: [System.DateTime]::Now

The next parameter which is set to falseis the switch for getting data for the month = false or the day = true.
If we want the data for another month than the we have to set up a date variable and use it instead of [System.DateTime]::Now :
$FilterDate = Get-Date "2014-01-20"
$searchApp.GetSearchReport(1,[System.Guid]::Empty,$site.ID,$FilterDate,$false,100)

Getting farm wide data we also had to replace the $site.ID variable with[System.Guid]::Empty”:
$searchApp.GetSearchReport(1,[System.Guid]::Empty,[System.Guid]::Empty,$FilterDate,$false,100)
The first parameter with the value “1” is setting the Event Type. Event Type 1 = views. The next parameter is the TenantID, followed by SiteID, date value, month / day switch and the max result value (100 means show me the top 100 search terms).

Samstag, 22. Februar 2014

Create and use own usage event type in SharePoint 2013


The original technet article says the following about usage event types in SharePoint 2013

“Usage events enable you to track how users interact with items on your site. Items can be documents, sites, or catalog items. When a user interacts with an item on your site, SharePoint Server 2013 generates a usage event for this action. For example, if you want to monitor how often a catalog item is viewed from a mobile phone, you can track this activity. This article describes how to create custom usage event types, and how to add code to record custom usage events so that they can be processed by the analytics processing component. You can use the data that is generated by usage events to show recommendations or popular items on your site. This article also explains how to influence how recommendations are shown by changing the level of importance for a specific usage event type.”

So far, so good. Now let’s see how this can be done because of some code snippets in the original article won’t work very well.
In the following example we will create a custom event called “UseFulPage” and add a button to SharePoint to fire that event.

Step 1: create a custom usage event type


#Connect to SSA
$SSP = Get-SPEnterpriseSearchServiceApplicationProxy
#create Event:
#modify the $EventName varibale to your value
$EventGuid = [Guid]::NewGuid()
$EventName = "UseFulPage"
$tenantConfig = $SSP.GetAnalyticsTenantConfiguration([Guid]::Empty)
$newEventType = $tenantConfig.RegisterEventType($EventGuid, $EventName, "")
$tenantConfig.Update($SSP)
#manipulate the weight of you event by setting RecommendationWeight & RelevanceWeight
$customEvent = $tenantConfig.EventTypeDefinitions | where-object { $_.EventName -eq $EventName }
$customEvent.RecommendationWeight = 10
$customEvent.RelevanceWeight = 10
$tenantConfig.Update($SSP)
#check if the event is created
$tenantConfig.EventTypeDefinitions | select eventTypeId,EventName | ft
The result should be something like that:
The new custom event had several properties and also 2 managed properties (UsageEvent1LifeTime & UsageEvent1Recent) which can directly be used in Search or Search Driven WebParts after the next analytics processing run.
Step 2:  add code to record the custom usage event
In the following script we need the GUID of the event. To get the GUID use this script:

$SSP = Get-SPEnterpriseSearchServiceApplicationProxy
$tenantConfig = $SSP.GetAnalyticsTenantConfiguration([Guid]::Empty)
$tenantConfig.EventTypeDefinitions | select AppEventTypeId,eventTypeId,EventName | ft

To add the event to a SharePoint site I use a JavaScript snippet (thx Markus Alt).
  1. Replace %EventGUID% with the GUID of your custom event.
  2. Replace %URL% with the URL of the site where you place the event. For example: http://intranet.contoso.com
  3. Use a ScriptEditor WebPart to host the script in your SharePoint site.
<script language="javascript">
function ToEventStore(url)
{
    alert("Useful Page Event recorded");
    ExecuteOrDelayUntilScriptLoaded(function()
    {
        var spClientContext = SP.ClientContext.get_current();
        var eventGuid = new SP.Guid("%EventGUID%");
        SP.Analytics.AnalyticsUsageEntry.logAnalyticsAppEvent(spClientContext, eventGuid, url);
        spClientContext.executeQueryAsync(null, Function.createDelegate(this, function(sender, e){ alert("Failed to log event for item: " + document.URL + " due to: " + e.get_message()) }));
    }, "SP.js");
}
</script>

<button onclick="ToEventStore('http://%URL%')">Useful Page</button>

Step 3: work with the event
Clicking the button brings up a message box which tells you that your click is recorded. That means that the event is send to analytics engine and is processed during the next run. So you have to wait until the next day to see the result. By the way: Analytics data is process only once a day. You can configure the schedule using the Set-AnalysisConfiguration cmdlet. Other important point is that only data from last day is processes, not from the actual day. Bella Engen descried in that post how to manually kick the Analytics so there is no waiting until next day to see the data: http://blogs.technet.com/b/tothesharepoint/archive/2014/01/21/modify-the-content-search-web-part-display-template-and-use-windows-powershell-to-start-usage-analytics-in-sharepoint-server-2013.aspx


Kicking the event of cause has an impact to the ranking of that site. Another option to bring the result out is to use the managed property “UsageEvent1Recent” in a Search WebPart as a sort option. Doin this you can build an overview based on search showing the most “Useful Pages” in you SharePoint:


Freitag, 26. Juli 2013

I am following


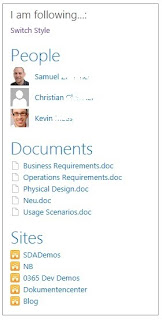
A new feature in SharePoint 2013 is „Following“. Users can follow nearly everything in SharePoint 2013. Not so nice is the fact that you only can get an overview of WHAT you are following using your MySite. The WebParts / List used to store and aggregate that data are not usable in any TeamSite etc. First thought was that the new and hyped SearchDriven technique could be the way to aggregate all the content a person followed also outside the MySite. FAILED. The content for example stored under “Site contents -> Social” in every MySite cannot be found using search. Also the suggestion part of the Following Feature is not based on Search Analytics. More details about Suggestions in the context of Following can be found here: https://www.nothingbutsharepoint.com/sites/eusp/Pages/SharePoint-Online-2013-Suggested-Sites-to-Follow.aspx

The facts that matters are:
·         Sites that are being followed by your colleagues.
·         Sites that are being followed by people you're following will tend to be recommended to you.
·         Sites that are being followed by a large number of people in your organization.
·         Sites that you have modified recently.

To get information about what a user is following we need to use a REST API call. MSDN documentation for this can be found here:  http://msdn.microsoft.com/en-us/library/dn194080.aspx

Using for example that method:
GET  http://<siteCollection>/<site>/_api/social.following/my/followed(types=15)

You get a JSON result set with information which documents, persons and sites the user fired the query is following.
Using this JSON result and some jQuery magic we can generate a WebPart containing this information in a list view:
Ore the same information as in METRO style:
For the jQuery Script to create that list go to: https://iamfollowing.codeplex.com/  That solution works with SharePoint 2013 only, on-prem or with O365 / SharePoint Online.
You can use other REST endpoints to feed the jQuery script to get other information’s, too.

DEMO @ YouTube:
 

Sonntag, 9. Juni 2013

PowerShell for SharePoint 2013 Analytics Feature

First of all
Thanks a lot to Thomas Molbach from Microsoft. He sends me his Scripts from his Session SPC 202 from last year SharePoint Conference in Las Vegas. So most of the PowerShell commands in this article are based on his scripts.
Working with PowerShell and the new SharePoint Analytics feature means that you have to set up your PowerShell environment first. Using the SharePoint Management Shell as it is won’t work.
Common stuff
To setup up a Management Shell you need to run the following script:

#Set up the Anaytics powershell environment
Add-PSSnapin Microsoft.SharePoint.PowerShell
Add-PSSnapin hostcontrollerpssnapin
Add-pssnapin junopssnapin
Add-pssnapin searchcorepssnapin
Add-pssnapin enginepssnapin
Add-pssnapin analysisenginepssnapin
$env:CERES_REGISTRY_PRODUCT_NAME = "Office Server\15.0\Search\Ceres"
Connect-System -Uri (Get-SPEnterpriseSearchServiceApplication).SystemManagerLocations[0] -ServiceIdentity (Get-SPEnterpriseSearchService).ProcessIdentity
Connect-AnalysisEngine -NodeName AdminComponent1

The major part is: Add-pssnapin analysisenginepssnapin . As you see the Analytics feature is not part of the common SharePoint PowerShell Snapin.
If everything worked fine you get the following status back:

Connected to agent 'AnalysisEngineComponent' of type Microsoft.Ceres.AnalysisEngine.Shared.IAnalysisEngineAgent running

Now we are able to get a full list of available command using:
Get-Command -Module analysisenginepssnapin
Some useful scripts
 
Start Usage Analytics Job:
Start-Analysis UsageAnalytics
 
Start Search Reports Job:
Start-Analysis SearchReports
 
Start Search Analytics Job:
$tj= Get-SPTimerJob -Type Microsoft.Office.Server.Search.Analytics.AnalyticsJobDefinition
$sa = $tj.GetAnalysis("Microsoft.Office.Server.Search.Analytics.SearchAnalyticsJob")
$sa.StartAnalysis()
 
Display Search Analytics Job status info:
$a = Get-SPTimerJob -Type Microsoft.Office.Server.Search.Analytics.AnalyticsJobDefinition
$sa = $a.GetAnalysis("Microsoft.Office.Server.Search.Analytics.SearchAnalyticsJob")
$sa.GetAnalysisInfo()
Display all Analytics Job status info:
Get-Analysis

Montag, 20. Mai 2013

Building Search Driven Solution with SharePoint 2013 Part II


Part I is about Search Driven in on-premise environments
Part II will show the options and differences with O365 SharePoint Online

In Part I I wrote about the options and scenarios with Search and Search Driven Apps in SharePoint 2013 on-premise. Now let’s see which option we have using the online version of new SharePoint 2013.

There are two big differences in SharePoint Online:

1.       We did not have the new Webpart Family “Search Driven Content”.

So in fact we only can use the common Search Result Webpart and its options within the Query Builder to create dynamic search solutions

2.       In SharePoint Online we are not able to configure own content sources ore manipulate the settings like Crawler scheduling etc.

Missing "content source" option in SharePoint Online and its impact


Because of the option “content sources” is not available in SharePoint Online we have to look for alternatives to bring in own content in our SharePoint Online environment. Another point is the index freshness which cannot be manipulated setting up Crawler scheduling ore manually decide to configure continuous crawling option.

Index freshness

Also in the official technet documentation is not a clear statement continuous crawling is set up by default for SharePoint Online or not. My own experience say: “Yes, it is”. I get search result in the index within 2min – 4min. This is really fast and for me in the most scenarios ok.

Own content

To bring in own content in you SharePoint Online Search you have to use “Result Sources” To set up those 3th Party Result Sources you can use “Site Setting” to configure them in the context of a Site Collection ore SharePoint Admin Center to do it global.
The dialog for setting up a Result Source shows the option for bring in own content:
·         Local SharePoint
·         Remote SharePoint
·         OpenSearch 1.0/1.1
·         Exchange
 
For all options you have to configure a security context to access the result source. Using Remote SharePoint you can use SSO or path thru authentication. Using Open Search we have the option to use Anonymous, Basic Authentication, Digest Authentication, NTLM, Form Authentication or Cookie Authentication. Using Remote SharePoint to call an on-premise SharePoint Search you have to set up a Search Federation based on an Identity Federation.
In all cases we had to configure a Remote Address and we can configure a Query Transformation (as described in Part I) to filter ore manipulate the query which is send to the remote system.
In my demo tenant I simply use some open search based systems.
 
Source
Source Url
Twitter
http://search.twitter.com/search.atom?q={searchTerms}
Facebook
http://search.live.com/results.aspx?q={searchTerms}+site%3afacebook.com&format=rss
YouTube
https://gdata.youtube.com/feeds/api/videos?q={searchterms}
(These can of cause also be remote endpoints for your LOB systems or other on-premise sources)

Setting up those systems as a “Result Source” get me the option to use them in my SharePoint Online system to build Search Driven experiences.


Search Driven experiences and solutions in SharePoint Online

Easiest way to use the new result source and within them remote content is using them in the result Webpart. In this example you can see an overview site in my SharePoint Online that aggregate News from configured social media sources based on Result Webparts:
For example filling the atwork area for Twitter news I configured the Result Webpart with those setting:
·         Setting up the “Select a query” with the “Twitter” Result Source
·         Fill in a query that focus to the desired results
Using the configured result sources within Query Rules (as described in Part I) we can build focused search experience like this social media search page:
Search Driven Solution can of cause also build based on SharePoint Online content. Here you see an example based on content placed in SharePoint Online lists ad libraries:
And of course you can mix results coming from remote sources and results coming from your SharePoint Online source.
This Webcast shows the described samples in action: