Label an Office document by using an existing custom property
This option
allows us to reflect on existing metadata values for example coming from
SharePoint or other solutions like for example Secure Islands (which was acquire
by Microsoft in 2015).
As a result
of this, when a document without an Azure Information Protection label is
opened and saved by a user, the document is then labeled to match the
corresponding property value.
This
configuration requires two settings in the advanced
client settings section. The first is named SyncPropertyName, which is the custom property name
that has been set from the other classification solution, or a property that is
set by SharePoint. The second is SyncPropertyState and must be set to OneWay:
- Key 1: SyncPropertyName
- Key 1 Value: <property name>
- Key 2: SyncPropertyState
- Key 2 Value: OneWay
Keys and
corresponding values are good for one custom property.
Example:
We have a
SharePoint column named Classification. Possible values are:
Public, Internal and Confidential.
SyncPropertyName value is then: Classification.
To make
this feature work we need labels with the same name (Public, Internal and Confidential) in AIP. Now, when an
Office documents from this SharePoint library is opened and saved and this
document is labeled as Public, Internal or Confidential in SharePoint Azure Information Protection applies the
corresponding AIP label. If no label with a corresponding name exists in AIP,
the document remains unlabeled.
More
details about how to label an Office document by using an existing custom
property: https://docs.microsoft.com/en-us/azure/information-protection/rms-client/client-admin-guide-customizations#label-an-office-document-by-using-an-existing-custom-property
Convert Templates to Labels
When you
create a label in AIP under the hood also a new custom template is created. This
new template can then be accessed by services and applications also using
Rights Management templates. The new template is not shown in Azure AIP portal
but can be managed by using PowerShell.
If you delete the label the template will still exists
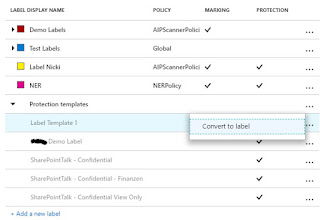
and is then shown in Azure AIP portal. In Azure AIP portal you can convert a
template to a label:
If you
change the protection settings in this newly created label, you're changing
them in the template and any user or service that uses this template will get
the new protection settings with the next template refresh.
More
details about labels and templates in AIP can be found in this article: https://docs.microsoft.com/en-us/azure/information-protection/configure-policy-templates#to-configure-the-templates-in-the-azure-information-protection-policy
Cloud App Security to auto apply Labels for scenario / location
Microsoft
Cloud App Security lets you apply AIP labels as part of a CAS policies. You can
also investigate files by filtering for the applied classification label within
Cloud App Security.
Scenarios:
- Apply classification labels as a governance action to files that match specific policies
- View all classified files in a central location
- Perform investigation according to classification level
- Create policies to make sure classified files are being handled properly
More details:
- Integrate AIP in CAS: https://docs.microsoft.com/en-us/cloud-app-security/azip-integration
- Automatically apply AIP labels using CAS: https://docs.microsoft.com/en-us/cloud-app-security/use-case-information-protection
Encrypting Emails using Exchange Mail Flow Rule
Exchange Mail Flow Rule can be used to automatically apply AIP labels:
This is
based on the RMS template associated to the AIP label.
A
step-by-step documentation on how to configure a mail flow rule using a RMS template
can be found here: https://blogs.technet.microsoft.com/kemckinn/2018/07/09/encrypting-emails-from-anywhere/
Decommissioning and deactivating protection
If AIP is
no longer needed you can deactivate it. Make sure that you have a copy of your Azure
Information Protection tenant key before you deactivate the Azure Rights
Management service. If you deactivate AIP make sure, that you won’t be locked
out of content that was previously protected.
You have
the following options to deactivate AIP:
- PowerShell cmdlet Disable-Aadrm to deactivate Rights Management
- Deactivate Rights Management from Office 365:
- Go to the Rights Management page for Office 365 administrators
- On the Rights Management page click deactivate
- Deactivate Rights Management from the Azure portal
- On Azure Information Protection blade => Protection activation blade, select Deactivate
Further details about deactivating AIP: https://docs.microsoft.com/en-us/azure/information-protection/deploy-use/decommission-deactivate
Related
posts:
- AzureInformation Protection Part I – Overview
- AzureInformation Protection Part II – PowerShell
- AzureInformation Protection Part III – AIP Scanner
- AzureInformation Protection Part IV – Work with AIP


